 |
 |
Truck Resto Rant
| September 23rd, 2014 at 4:45:23 PM permalink | |
| Face Member since: Oct 24, 2012 Threads: 61 Posts: 3941 | Crippled or no, I had a double header last weekend, and I just can't say no. Out of all the minutes, I only took one bad hit where I wasn't expecting it and instinctively put my arm out to catch myself as I fell. That hurt enough to send me to the bench and rock back and forth in pain, but like most stingers, it faded by the time my next shift came up. And hell, if I can play two games and nab a game winning assist, I can get to work =p The tape idea worked, but it was still a pain in the ass. Mostly I crammed bondo in between the two shells and allowed the tape to catch it as it dripped. That created a sort of stringy web on which to apply the rest. Sanding of course revealed the tape, so I ripped it out (taking some bondo with it). In all it wasn't difficult, just time consuming. Mix, spread, wait to dry, sand, mix, spread, wait to dry, sand. Do that about 6 or 7 times, and viola!, new door. 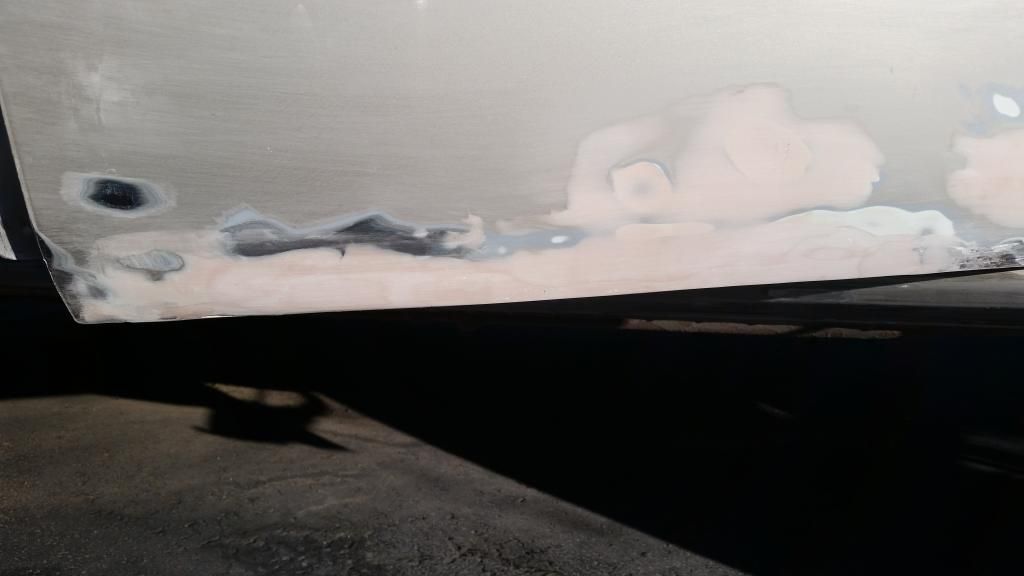 It's a little wavy as I didn't block sand it, but as much as you could hardly noticed the rampant rot, I doubt you'll notice a bit of waviness way down there. I'm just glad it won't break off when I inevitably close a rod or hockey stick in it. I've spent the last two days a victim of my own perfectionism. I keep forgetting that this is to preserve and not to enter into car shows. A half hour to sand an area rough turns into 4 hours of getting every little dimple and every atom of iron oxide off the thing. The one corner of the cab was way worse that first glance showed. There was a fingertip sized hole that punched through, small enough that a dollop of bondo would've covered it nice. But as soon as I put a wheel to it, the entire thing just disintegrated. That little fingertip turned into a four finger gap, eating up another two hours of the mix and sand dance. At least this one ended well; I recreated the whole corner and it is perfectly formed and smooth. 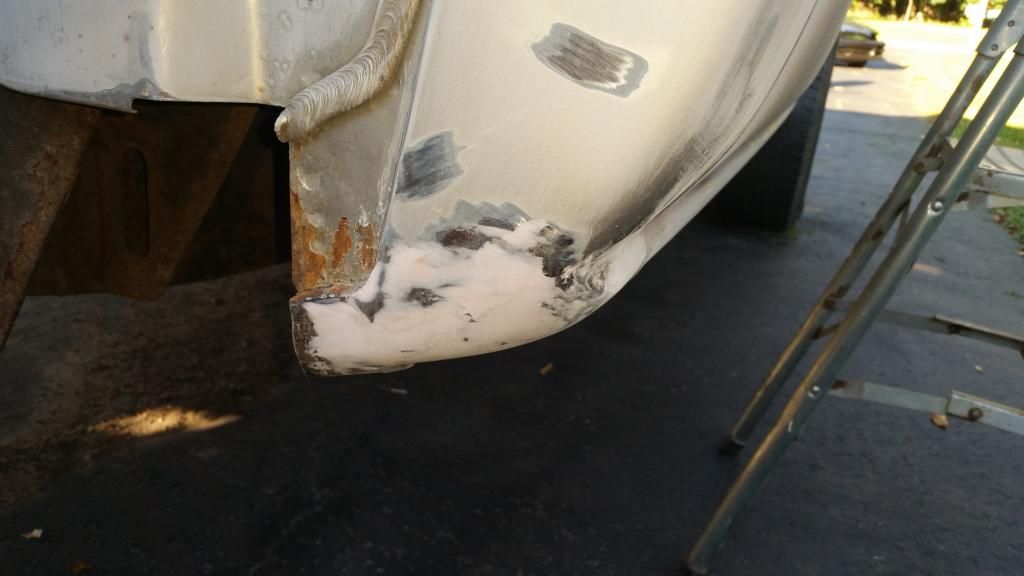 I finally broke down and spent the money, obtaining enough sealer, paint, reducer, and hardener to do the job (I hope, at least =p) I basically went off the Sheriff's use of 2 gal for his 'Cuda, and figured it'd be about the same. He of course did every square inch of metal while I'm not, but my truck is bigger and I'll be doing more coats. If anything I'm confident I got too much, and I'll just use it up on the race car next Spring. Then they'll match=) So it's washed, dried, and pulled into the garage. I suppose tomorrow I'll rub it down and shoot it with sealer. Pretty much most of the time will be masking everything off, and as long as the fumes aren't overpowering, the rest of the cab portion of this project should go quickly. Be bold and risk defeat, or be cautious and encourage it. |
| September 24th, 2014 at 5:38:38 PM permalink | |
| Face Member since: Oct 24, 2012 Threads: 61 Posts: 3941 |
Jesus wept. 4 and a half hours. If ever you get a ride painted, please, tip the bondo and tape guy. I of course have been taking it to the next level. The slop job on my race car has taught me much, and the breaks have been much of my focus. Wherever the paint ends, that's where you'll run into problems. My car is still nice, even after an entire race season. But everywhere there's a break, like the rubber seal where the windows were, has a few chips. You really have to end the paint right on a perfect edge; no overspray onto the seals, no overlap of tape onto metal. Getting that tape just perfect along the seals was a huge time sink. The large, flat areas, like the rear window, weren't too bad. The paper sits nice, and it's easy to run a blade along the strip. But convex surfaces like the windshield, or the 3-D, irregular shape of the door handles, took quite a bit of finagling. But, any way you slice it, I am completely happy with what I have. I'm really hoping all this attention to detail pays off. After all, all of the quality of the finished product is in the prep. I suppose it makes me relieved in that I've done it to the best of my ability, but it also make me nervous. If this turns out badly, someone is gonna die ;) A big shout out to Chevy. Their front end is beautifully engineered. Rarely do you find a modern car that is so user friendly. The headlights just have a little slide bar holding them in. Pull it out with your fingers and the whole light assembly falls out. The grille is held by 4 push pins into a cowl, and 4 tabs that simply snap in. A flathead to pop the pins, a sharp tug, and the grille came right out. The lower set of lights are held by a simple clip, identical to those that connect the plugs for a wiring harness. Push in the tab, pull it out, and the bottom lights were removed. All of the front end came out in less than 10 minutes, and could be done without a single tool. So, I scuffed a little bit more on the hood where it sits, making sure there was a good adhering surface for the paint. I removed the plastic mud shield in the wheel well and sanded a bit in there, and the whole thing is taped and ready to go. Tomorrow I'll cover the grille, bag the tires, the whole thing will get a good rub down with paint thinner to remove any bit of oils from my hands, and we'll start shooting the sealer. 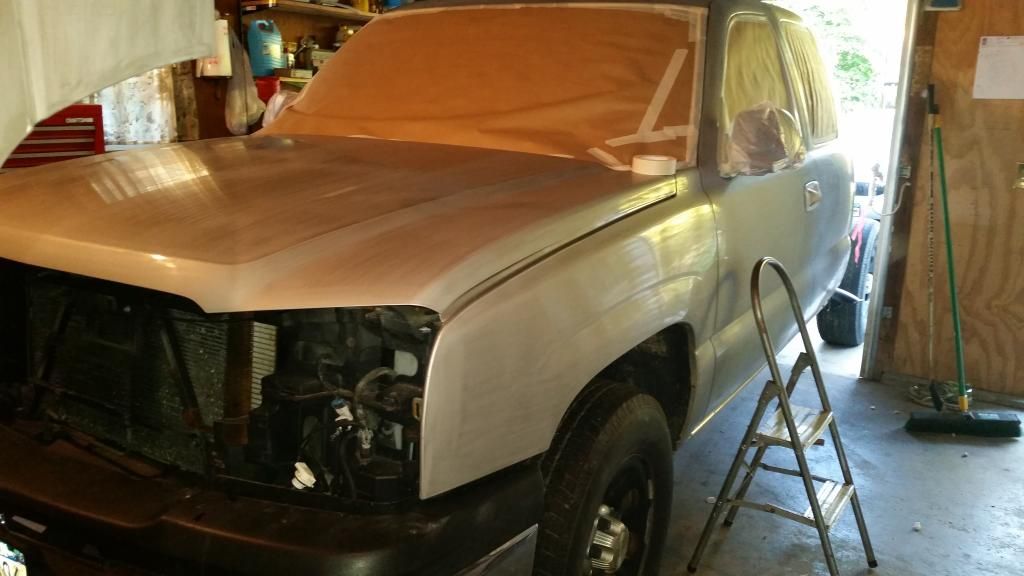 Be bold and risk defeat, or be cautious and encourage it. |
| September 25th, 2014 at 3:18:23 PM permalink | |
| Face Member since: Oct 24, 2012 Threads: 61 Posts: 3941 | Crikey... I can taste colors @.@ No complaints. I went until I could barely stand, and that happened to be long enough to do the job. The sealer mixed well and went on very easy; even the hard parts that I had to "slop on" never ran or wrinkled. It's a little patchy since I was aiming for coverage and not evenness, but even so... I have half a mind to just clear it and leave it as is. I love the color, a sort of gun metal grey almost identical to the color of my kid's eyes when he was born. The hood was a bit of a bitch. It's just so big, and the gun prefers to be at a slight angle as opposed to totally horizontal. Rather than directly spray it I had to sort of spray over it and let the particles fall. I'm a little worried about the paint portion, but we'll cross that bridge when we come to it. The roof was probably the most horrible, as having to both extend and raise my arm to maximum length was popping, painful misery. But I got it done, and am happy with the results. The rocker panels were the most stupid. The gun is a good 12" long. Add another 4" at least for the air pressure regulator and water filter, then at least 6" more for the portion of the hose that's too short to bend, and the whole contraption is nearly two feet long. Having to do the underside when the gun doesn't like being tipped is just stupid. Besides having to sweep back and forth to keep an even layer, I had to also shake it to get the material up into the puckup. So after having to sweep, shake, and support my body, my shoulder is completely FUBAR. Might have to dip into the meds to carry on tomorrow =/ But whatever, it's done. Don't reckon it needs a bit of sanding, so tomorrow should just be a quick wipe down to get the loose particles removed, and we'll start the paint portion of the cab.  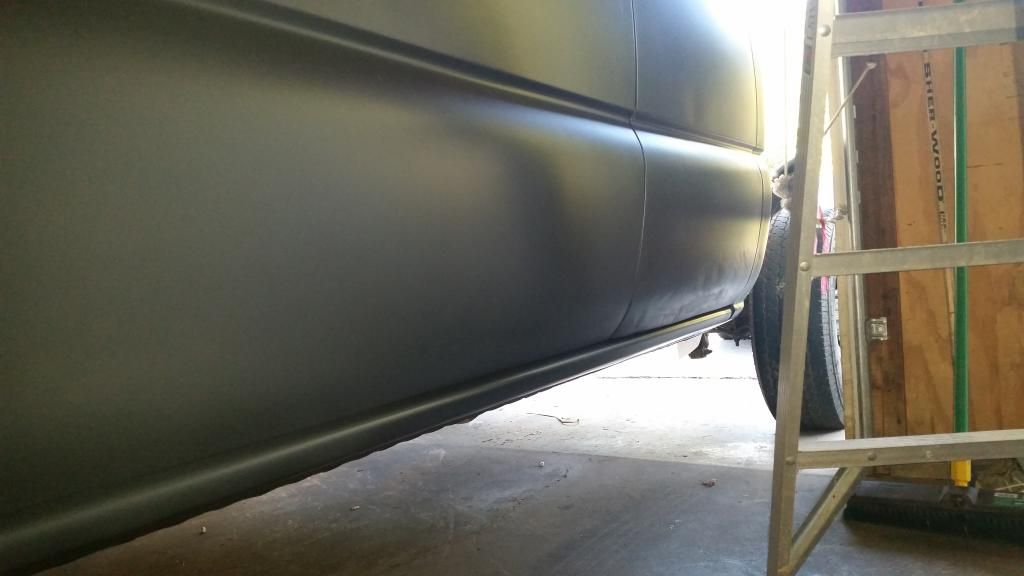 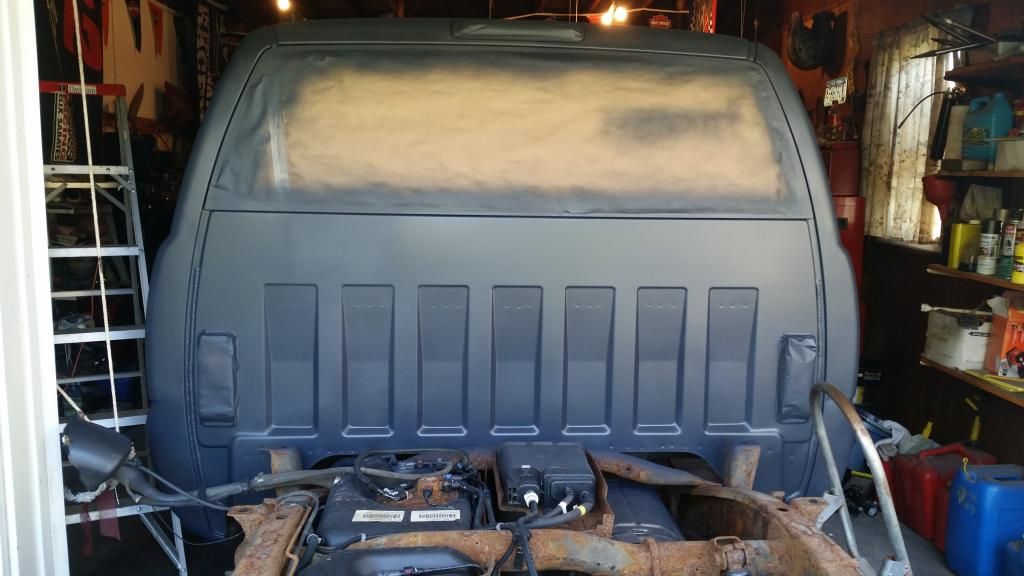  As an aside: Babs, I say we in-house the livery for TreeTop airlines. I was thinking Richthofen for our bush plane division, and a nice P40 get up for the larger airframes. Lemme do it and I'll give no quarrel out sourcing the mechanics ;)   Be bold and risk defeat, or be cautious and encourage it. |
| September 25th, 2014 at 3:36:54 PM permalink | |
| petroglyph Member since: Aug 3, 2014 Threads: 25 Posts: 6227 | What are you using to paint with an airless?? Those are for house painting man. No, I was kidding for my intro. Can't the water trap be at the compressor? Also, would it help to lift the hood? That would give you a different angle. If you had two wings it could be removed to paint underneath and the edges as well, same with the doors. Any work I do now has to be at waste level, so those things come to mind. I could never find the runs until I drove somewhere and got a different light on the paint. Or after everything was cleaned and stored. The last official act of any government is to loot the treasury. GW |
| September 25th, 2014 at 3:49:57 PM permalink | |
| Face Member since: Oct 24, 2012 Threads: 61 Posts: 3941 | Funny, I yelled to my g/f to "go buy me a cordless gun" because I was having so much trouble. It's rare you get to see the wheels physically turning in one's head. I enjoyed it =) And yeah, the trap could be. They even have all sorts of heating/cooling pipes you can rig in to make it perfectly dry with zero chance of error. I'm not that advanced. My garage's motto is "meh, that's good enough" =p Lifting the hood presents its own set of problems, not least of which is the front of it would then be as high as the roof and that hurts. Then I'd have to re-tape the windshield (lifting would tear the paper already present) and then paper up the entire engine compartment to protect from overspray. Not to mention to get the proper angle, I'd have to sit on the windshield. Like everything, taking it completely off would turn it into a 15 minute, perfect spray. But... leaving it on is good enough =p I am worried about the lighting. My garage already has atrocious lighting, which is further reduced by having the garage door up and blocking some of it. I put it down to get the roof and that was better, but painting in a small enclosed garage makes everything run - the paint, the walls, my g/f's face XD That needs to stay open as I can't afford a trip to the ER for acetone poisoning. Be bold and risk defeat, or be cautious and encourage it. |
| September 25th, 2014 at 3:53:45 PM permalink | |
| AZDuffman Member since: Oct 24, 2012 Threads: 137 Posts: 21266 | Out of complete curiosity, should the tires be taped or are you going to replace them anyways? War is peace. Freedom is slavery. Ignorance is strength |
| September 25th, 2014 at 4:59:31 PM permalink | |
| Face Member since: Oct 24, 2012 Threads: 61 Posts: 3941 |
C'mon, AZD. The "Good Enough Garage" ain't got time to be bagging tires ;) In reality, I gave a half assed attempt. My car I just threw a garbage bag over them, but it's easy getting a bag over 185's. 245's, not so much. They didn't fit, and I was too eager to get started to want to cut and tape up a barrier. The rims need retouching anyways, so I wasn't worried about them. And since I'm not one to Armor All my tires to a slick finish, any overspray will be overshadowed by the mud stains usually present. Plus, I did get a pretty decent coat on my race tires when I resprayed the damaged side, and the flex and heat seemed to have made it flake off almost immediately. So, yes. They should be taped up, and if they weren't almost bald and I didn't have factory steel rims, I probably would have done so. Be bold and risk defeat, or be cautious and encourage it. |
| September 25th, 2014 at 5:22:48 PM permalink | |
| AZDuffman Member since: Oct 24, 2012 Threads: 137 Posts: 21266 |
Last "good enough garage" I was involved in saw a guy drop $20,000+ in 1991 dollars on a 1972 Dodge Demon that never saw the road under its own power again as long as the guy owned it. But that is another thread................. :-)
All makes sense, just wondered because my eye for detail kind of stays on autopilot after work. Today my chief realized thery gave me the wrong map but somehow I researched the *right* parcel while some other guy who got my map (same owner, flip-flopped maps somehow.) So she says I am OK, did the right one, but wondering how on earth I managed it. I deduced it somehow by the details but didn't remember which. So after all this I see the tires and wonder. Some nights I wish I could be a lump after work like everyone else. Anyways, project looks good! No emeron on the outside now! War is peace. Freedom is slavery. Ignorance is strength |
| September 25th, 2014 at 6:19:01 PM permalink | |
| Face Member since: Oct 24, 2012 Threads: 61 Posts: 3941 |
Hey, now. Don't go grouping me in with that knuckle head. At least my products get finished =p "Good enough" is subjective, and I'm just basing it off my peers. The Sheriff has a full resto '68 'Cuda, an almost finished frame off '73 'Cuda, and just nabbed that '71 Challenger. My high school buddy turned a rot box Super Bee into a $60,000+ show car, has a mint '71 'Cuda, and has a mint, several-times-award-winning A12. Compared to them, I'm a complete hack. I'm not the next Chip Foose nor do I want to be. And my race car might be a junk yard dog that only a redneck could be proud of, but that sumbitch runs and even won a race. And that's Good Enough for me =)
Better to not turn off than not be able to turn on. I'm the same way, noticing a chrome bumper cover that should be painted, or the wrong era cowls on a certain year car. You can't help it, it just comes to you. And no worries on the emron. I was half contemplating it for next years race paint as I could use the durability. But somewhere along my path of life (have no idea where or when) I learned to read a Material Safety Data Sheet. Doesn't matter if I could do a good job or not, that'd be the last project you ever heard from me. It probably be the last you heard from me period, unless Paco managed to track down my obit. I'd have been dead within the day =/ Be bold and risk defeat, or be cautious and encourage it. |
| September 26th, 2014 at 1:09:16 PM permalink | |
| Face Member since: Oct 24, 2012 Threads: 61 Posts: 3941 | Wiz would never go for it, and honestly, I wouldn't either. But sometimes I wish there was a thread where you could just tear loose and be as nasty as you could possibly be. Cuz right now I've got a tirade simmering that would make Dice Clay say "whoa, take it easy!". It's hard to even put into words using language permitted here. Suffice to say that if I had a gun, and found the man responsible, I couldn't even shoot him. I'd need to hit him with it. In the face. And I'd not be satisfied until the hits in the face came out the back of his head. I can't even remember the last time I've been this close to losing control XO I came out today to find my gun leaking air. Mind you, I just used it for hours, disassembled it for perfect cleaning, and put it back together. It was perfect. It's never been dropped or bumped, nothing has been dropped on it. It simply worked, then it didn't. I've only used it twice, weren't a scratch on it. So I find it's the damned coupler. It's basically just a nut that has threaded bungs on each side. One side screws into the bottom of the gun, the other screws into the pressure regulator. When I unscrewed the regulator, I saw it was chipped. It was missing a 1-2mm chunk out of the edge. How the french toast that happened, I don't fruit cake know. But whatever, I'll just thread tape it up and put it back together. Nope, still leaked. So I take it back apart and find that whole bung is cracked to shoot 'n heck. I touch it, and it basically crumbles. How? Good front door question. They're usually made of brass; this surely wasn't. It looked like chrome-moly, on the outside, at least. The inside looked like dried nougat. You laugh, that's what it looked like. It was porous, almost like pumice. But what the fridge ever, I have couplers here. I go to screw it out and the nut snaps off, leaving the bung in the gun. Son of a Charlie Batch. So what now? Hell if I know. I didn't have anything proper to get it out, so I tried just jamming a screwdriver in there, hoping it would catch on the soft metal and allow me to turn it out. Nope. Maybe it'll at least disintegrate like the rest of it and fall out? Nope. Well, to Hamburg with all this mess, I'm just gonna drill it out, hoping that making it thinner will help break it apart. Nope. Fine, I'll just drill it right to the edge of the threads, and just tap it so I can thread in a new coupler. Nope. For TWO FRANKFURT HOURS I Finland with that piece of Shardik, trying to drill with the precision of a CNC so I could tap that new coupler in. And you know what? Miracle of miracles I did it. I managed to file it away an atom at a time and was able to tap in the new coupler. Put it back together, and of course, it leaks. No worries. 2 hours down but I'll be back in business, I just need to remove it, thread tape it, and we're good to go. I remove it, thread tape it, put it back together, and the handle of the gun gives up, splitting two inches.  /sigh. Thanks for listening. Now I gotta go put my bicycle together so I can bike into town and hope a mom and pop shop carries what I need. Reckon the hills of Zoar should be enough to burn off this murderous rage. Be bold and risk defeat, or be cautious and encourage it. |